With Port Address Translation (PAT), a single public IP address is used for all internal private IP addresses, but a different port is assigned to each private IP address. This type of NAT is also known as NAT Overload and is the typical form of NAT used in today’s networks. It is even supported by most consumer-grade routers.
PAT allows you to support many hosts with only few public IP addresses. It works by creating dynamic NAT mapping, in which a global (public) IP address and a unique port number are selected. The router keeps a NAT table entry for every unique combination of the private IP address and port, with translation to the global address and a unique port number.
We will use the following example network to explain the benefits of using PAT:
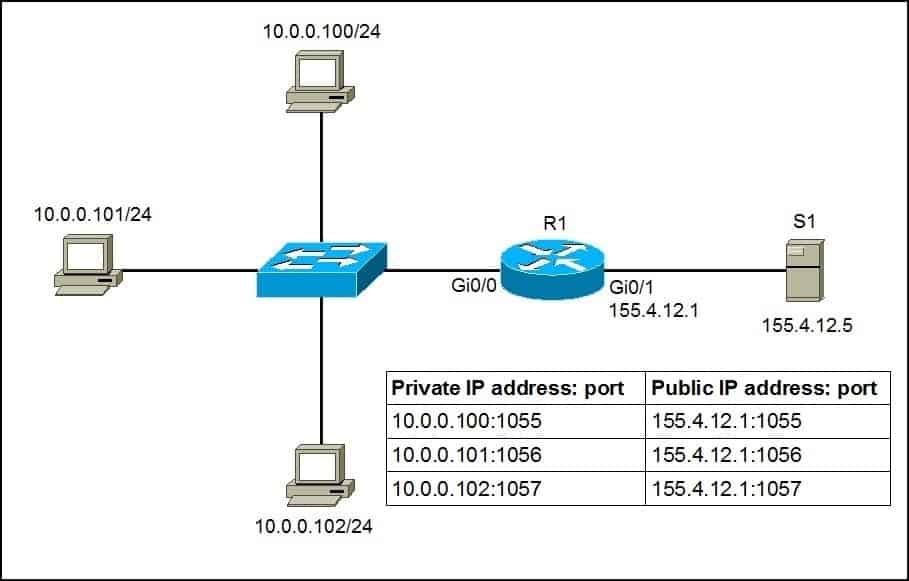
As you can see in the picture above, PAT uses unique source port numbers on the inside global (public) IP address to distinguish between translations. For example, if the host with the IP address of 10.0.0.101 wants to access the server S1 on the Internet, the host’s private IP address will be translated by R1 to 155.4.12.1:1056 and the request will be sent to S1. S1 will respond to 155.4.12.1:1056. R1 will receive that response, look up in its NAT translation table, and forward the request to the host.
To configure PAT, the following commands are required:
- configure the router’s inside interface using the ip nat inside command.
- configure the router’s outside interface using the ip nat outside command.
- configure an access list that includes a list of the inside source addresses that should be translated.
- enable PAT with the ip nat inside source list ACL_NUMBER interface TYPE overload global configuration command.
Here is how we would configure PAT for the network picture above.
First, we will define the outside and inside interfaces on R1:
R1(config)#int Gi0/0
R1(config-if)#ip nat inside
R1(config-if)#int Gi0/1
R1(config-if)#ip nat outside
Next, we will define an access list that will include all private IP addresses we would like to translate:
R1(config-if)#access-list 1 permit 10.0.0.0 0.0.0.255
The access list defined above includes all IP addresses from the 10.0.0.0 – 10.0.0.255 range.
Now we need to enable NAT and refer to the ACL created in the previous step and to the interface whose IP address will be used for translations:
R1(config)#ip nat inside source list 1 interface Gi0/1 overload
To verify the NAT translations, we can use the show ip nat translations command after hosts request a web resource from S1:
R1#show ip nat translations
Pro Inside global Inside local Outside local Outside global
tcp 155.4.12.1:1024 10.0.0.100:1025 155.4.12.5:80 155.4.12.5:80
tcp 155.4.12.1:1025 10.0.0.101:1025 155.4.12.5:80 155.4.12.5:80
tcp 155.4.12.1:1026 10.0.0.102:1025 155.4.12.5:80 155.4.12.5:80
Notice that the same IP address (155.4.12.1) has been used to translate three private IP addresses (10.0.0.100, 10.0.0.101, and 10.0.0.102). The port number of the public IP address is unique for each connection. So when S1 responds to 155.4.12.1:1026, R1 look into its NAT translations table and forward the response to 10.0.0.102:1025
Download our Free CCNA Study Guide PDF for complete notes on all the CCNA 200-301 exam topics in one book.
We recommend the Cisco CCNA Gold Bootcamp as your main CCNA training course. It’s the highest rated Cisco course online with an average rating of 4.8 from over 30,000 public reviews and is the gold standard in CCNA training:
