With both IPv4 and IPv6 routing, we can use static routing and/or dynamic routing protocols, either Link State routing protocol or Distance Vector protocol to easily distribute routes. A static route is typically used when there is a single route or a preferred route for the traffic to reach a destination. Static routing utilizes small routing tables with a single entry or route for each destination. It also requires less computation time than dynamic routing because every route is preconfigured.
IPv4 vs IPv6 Routing
Routing is configured to enable communication between different networks. IPv6 works in the same way as IPv4 in terms of routing, but it has a separate routing table and process. If the router receives a packet using the IPv4 scheme, it will route the traffic based on the IPv4 routing table. On the other hand, if it receives an IPv6 address, it will route the traffic based on the IPv6 routing table. The mechanism in terms of configuration syntax and operation of both IPv4 and IPv6 is almost the same. The notable difference is changing the IPv4 address to IPv6 address on the configuration.
IPv6 Static Route Configuration
By default, IPv6 is disabled globally. To enable it, you can enter the command ‘ipv6 unicast-routing’ in the global configuration mode. We can still enable IPv6 in every interface, but it only accepts IPv6 traffic on a specific interface and will not forward the traffic to another interface on which IPv6 is not enabled. That approach is good for security reasons if you want to isolate the IPv6 traffic on a specific interface.
In configuring an IPv6 static route, we will use the same procedure and configuration syntax that we are using in configuring IPv4 static routes. For our example configuration, we will use the topology below:
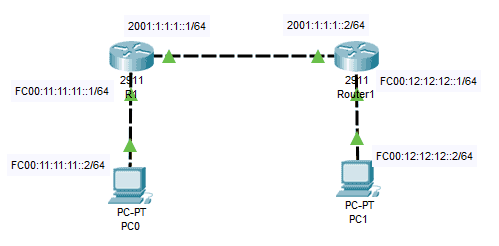
1. Enable IPv6 on global configuration.
R1(config)#ipv6 unicast-routing
R2(config)#ipv6 unicast-routing
2. Configure the IPv6 addresses on the interfaces. We will use the network prefix /64.
R1(config)#int g0/0

R1(config-if)#ipv6 add 2001:1:1:1::1/64

R1(config-if)#no shut

R1(config-if)#int g0/1

R1(config-if)#ipv6 add FC00:11:11:11::1/64

R1(config-if)#no shut
R2(config)#int g0/0

R2(config-if)#ipv6 add 2001:1:1:1::2/64

R2(config-if)#no shut

R2(config-if)#int g0/1

R2(config-if)#ipv6 add FC00:12:12:12::1/64

R2(config-if)#no shut
3. Configure the IPv6 static route on each interface. We will use the next-hop address instead of the output interface. We will use the network prefixes /64.
R1(config)#ipv6 route FC00:12:12:12::/64 2001:1:1:1::2
R2(config)#ipv6 route FC00:11:11:11::/64 2001:1:1:1::1
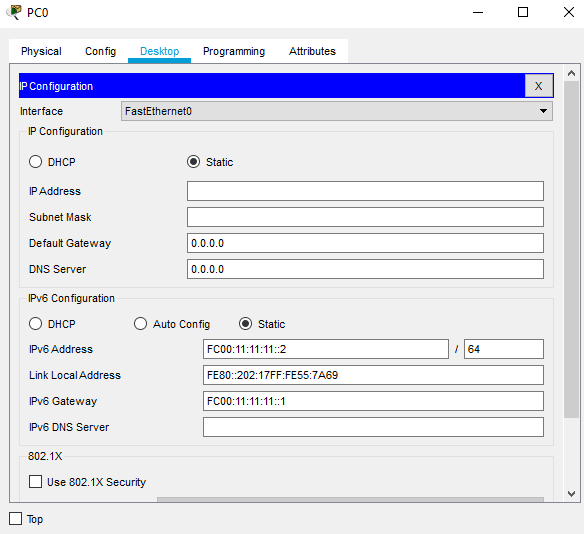
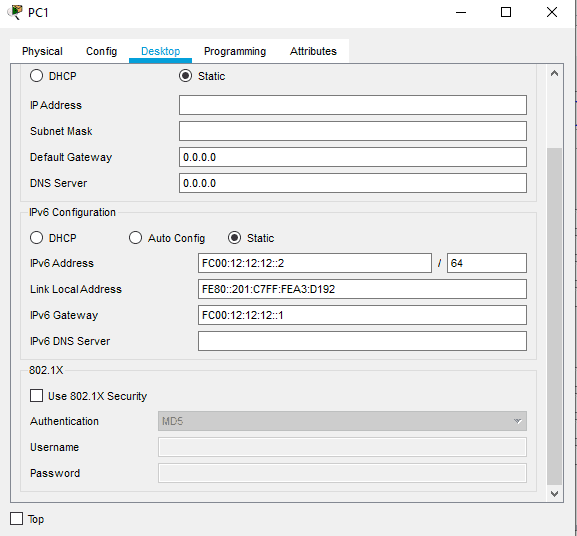
4. Configure IPv6 address and gateway on each PC. The below link-local address will be populated automatically. IPv6 link-local addresses are addresses that can be used to communicate with nodes (hosts and routers).
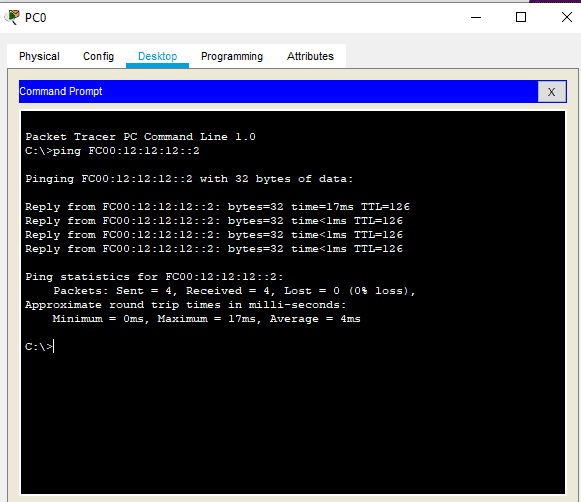
5. Verify by using end-to-end ping testing from each PC.

Download our Free CCNA Study Guide PDF for complete notes on all the CCNA 200-301 exam topics in one book.
We recommend the Cisco CCNA Gold Bootcamp as your main CCNA training course. It’s the highest rated Cisco course online with an average rating of 4.8 from over 30,000 public reviews and is the gold standard in CCNA training:
